Pages

Friday, July 29, 2011

Inkspirations Challenge #80 - Blooming Step Card

It's Friday again, (best night of the week), & it's Inkspirations time!  This week Keesh has set these fun colours:-


I've gone a bit OTT this week, & made a very "full" step card, lol:-


Here's what the steps looked like, before I started adding flowers & grass:-


 & this is what it looked like, before I decided to add a couple more flowers to accentuate the sentiment:-


Someone, somewhere in the world has probably used the scallop edge punch to make grass before, but if you are interested, here is how I made it:-

Firstly punch a strip of cardstock with the scallop edge punch:-


Then, with your punch turned upside down, place the strip back in & offset the bumps of the scallops on your cardstock between the dips of the scallops on the punch (don't line them up perfectly in the centre as you will have quite "chunky" grass):-


Your edge should look something like this (maybe not as blurry though, lol!):-  


As you can see above, it's not an exact science & you don't have to be too particular, seeing as grass can be a pretty random thing.

Next you need to put your cardstock strip back in the punch again, lining up the thicker blades of grass in the dips between the bumps on the punch.  This will be the result:-


As for the sentiment panel, I cut a 1" strip & achieved the fancy edge by using the piece on the outside of the punch (which would usually be waste).  I turned the strip around & punched the other end to match.  :)

Hope this has given you some ideas to play with.  :)

If you would like to play along in the challenge & see the awesome creations that that rest of the DT have provided, please check out the links:-
Card Components
All SU - please drop me an email if you have any queries.  :)

Friday, July 22, 2011

Inkspirations Challenge #79 - DYI Embossed Background

Hello, thanks for coming to visit!  This week's Inkspirations Challenge is a fantastic sketch, that you are sure to love.  Here it is:-


Nice & easy, & oh so versatile.  Here is what I have done with it:-


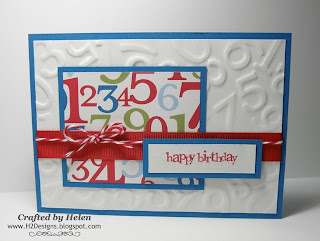
I decided to go for a nice, clean card, with this numeral DSP.  The only thing was, I didn't want a plain white background, so I decided to add a bit of texture.  You may have realised by now, I like to experiment!!!  :D
So experiment I did, lol - I made by own embossed background....

I grabbed a sheet of cardstock, stuck a Sizzix Adhesive Sheet to it & then die cut a whole stack of numbers.  For each number, I stuck three layers together, (easy to do with the sticky adhesive backing) which in effect made a "chipboard" number.  Then I laid them randomly on a piece of A6 cardstock.  (I didn't cover the entire piece as the centre was going to be covered by other layers of my card.)


I sat this sheet on top of my fully open multi-purpose platform, added my white cardstock panel, which I had misted with alcohol, layered the black Sizzix rubber embossing mat on top & then put my two clear plates on top.  I cranked this sandwich through the Big Shot & voila, embossed numeral background:-


Here's the completed card again:-


The rest of the card is quite simple, but I like the sleek, graphic look.
Thanks for dropping by - I hope you are all inspired.  As for me, I'm going back to play some more with the Big Shot!!!

Here are the links so you can see what the rest of the Team have done with this great sketch:-
Card Components: (All SU except as noted)
Cardstock:  Pacific Point, Whisper White
DSP:  Celebrations
Stamps:  Party This Way
Inks:  Real Red
Other:  Real Red Grosgrain Ribbon, Dimensionals
Non SU:  Alcohol, Baker's Twine

Friday, July 15, 2011

Inkspirations Challenge #78 - Flip Flop - Fast & Fabulous!

Welcome to another Inkspirations Challenge.  This week Keesh has these gorgeous colours for you to work with:-


I have made a Flip Flop (or Swing) card with this palette:- 


These cards are really quite simple to make, but have a fun factor when you open them & the "flip flop" action happens:-


Here are both the front & reverse sides of the card, fully open:-


I have used the SU Hostess set "Fast & Fabulous" which has sweet two step floral images.  I have combined this with the grungy splodges & script from the French Foliage set & added some pearl accents & sponging.

If you would like to try this style of card, I have added the measurements to the photo below:-


You can see the rest of the Team's amazing inspiration pieces, by heading over to the Inkspirations Challenges site.


Card Components (All SU unless noted)
Cardstock:  Crumb Cake, Perfect Plum, Very Vanilla, Rose Red
Stamps:  Fast & Fabulous, Woodgrain, French Foliage
Inks:  Crumb Cake, Rose Red, Perfect Plum 
Tools/Other:  Modern Label Punch, Sponges, Dimensionals, Pearls, Vanilla Taffeta Ribbon, Masking Paper

Friday, July 8, 2011

Inkspirations Challenge #77 - A Bit of Brayering

Hi & welcome to my weekly post, lol.  It's Inkspirations Challenge time & here is this week's sketch:-


I am having some major computer issues this week.  (My dear old desktop has died & I think the laptop is going out in sympathy, so I've moved on to DS's computer - hope I don't break this one too!)

I have to admit, I found the little box thingy down the bottom of the sketch a bit tricky - I tried all sorts of things on my card, but none actually worked, so I chose to omit that part of the sketch.  Sorry Keesh!  :)

Inspiration for my card comes from the very talented Paula Dobson, who is an absolute master with sponging.  I have just unpacked this set & decided to use it as a silhouette image, a la Paula.  I have created the background using a brayer & sponges.


Love this sentiment:-


Hop on over to the challenge blog & you can see what the rest of the team have been up to:-
Inkspirations Challenges Site Makeesha Brandi Carrie Cindy Helen Ilina Kirsty Lee-Anne Marisa Renée
Card Components (All SU unless noted)
Cardstock:   Basic Black, Whisper White, White Vellum
Stamps:  Every Moment
Inks:  Basic Black pad & marker, Bashful Blue, Baja Breeze, Marina Mist, Not Quite Navy, Night of Navy, Black StazOn
Tools:  1.3/4" Circle Punch, Post It Notes, Brayer, Sponges
Non SU:  Black Brads, White Gel Pen

Friday, July 1, 2011

Inkspirations Challenge #76 - Button Birdies

Welcome to another challenge for Inkspirations!  This week you have these fun colours to play with:-


I decided to pull out a PTI set that hasn't seen a lot of love, even though it has cute line art images to use with buttons & lots of sentiments.  Here is my card:-


I have chosen to make a layered, all white card, with a few spots of colour.  Each layer of white has been popped up on dimensionals.

The buttons I used were not the same size as intended for the stamps, so I lightly traced around each button in pencil & then, using a marker to ink the stamp, added the details, one body part at a time!  I have stamped their wings on matching cardstock using white ink & cut them out.  Here are the little chickies:-


I created the band of colour at the bottom using a square punch & a strip of Sizzix adhesive sheet (this is great stuff) & added an organza ribbon.

Now make sure you head over to the Challenge blog & see what lovely creations the DT have to inspire you:-
Inkspirations Challenges Site Makeesha Brandi Carrie Cindy Helen Ilina Kirsty Lee-Anne Marisa Renée
Card Components (All SU unless noted)
Cardstock:  Whisper White, Baja Breeze, Peach Parfait, Poppy Parade
DSP:  Hostess 6x6 InColor, retired Baja print
Inks:  Basic Black marker, White craft ink
Other:  Organza Ribbon, 1.1/2" Square Punch (used for colour band), Sizzix Adhesive Sheets, Dimensionals
Non SU:  PTI Everyday Button Bits stamp set, Black Pearls, mini Black Gems