Pages

Monday, April 16, 2012

Freshly Made Sketches #30 - A Very Special 21st Pop-Up!

This week's sketch at Freshly Made Sketches was the inspiration I needed to create this card - I used the sketch for the inside:-


Here's the sketch (which I have rotated 90 degrees):-


& here's the front:-


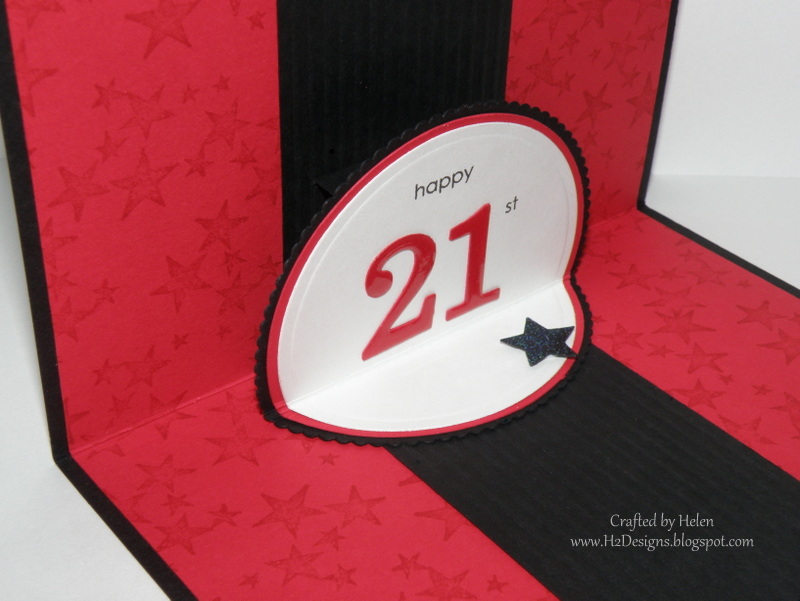
So now you can probably guess why it's special.  :)  DS is not one for a lot of fuss, so I've gone with clean lines & subtle interest by way of self coloured stamping, embossed lines on the black stripes, white shimmer panels, a miniature scallop edge on the black circles, iridescent ice embossing on the stars, crystal effects on the 21 & the internal pop-up!

Here are some close-ups of the inside:-


Hope it passes muster!

Card Components  (SU except as noted)
Cardstock:  Basic Black, Real Red & Shimmery White
Stamps:  Wonderful Favourites (retired), Extreme Elements
Inks:  Basic Black, Real Red, Versamark
Other:  Iridescent Ice Embossing Powder, Clear Embossing Powder, Scoring Tool, Dimensionals, Timeless Type Alphabet Dies
Non SU:  Star Punch, "happy" & "st" computer generated, Circle Nesties, computer die-cut circle & scallop circles

Thursday, April 12, 2012

RetroSketches #6 - A Gorjuss Girl!

This week's sketch at Retrosketches is a lovely layout that can be interpreted many ways.  I've gone for really clean & simple, after having created a couple of rather fussy, frilly cards recently.

Here's my card:-

(You can click on the images for a larger view)

& this is the sketch:-


To keep the focus on the coloured image, I've embossed a strip in the white panel & have extended it beyond the square, using a border punch to finish off the faux "banner".  Here's a close up:-


Many thanks to Bronwyn Eastley (*waving madly*) at addINKtive designs for the "Gorjuss Girl" image, which I stamped when I visited Bron in Tassie, earlier in the year.  The image has been coloured with Prismacolor pencils, blended with Gamsol, then fussy cut & popped up on dimensionals.  I've added glitter pen to the flower centres & clear glazed the toadstool.  The chocolate layer has also been raised on dimensionals.

I didn't have the sentiment I was after in my stash, so this one has been computer generated.  :)

Card Components  (SU except as noted)
Cardstock:  Island Indigo, Chocolate Chip, Whisper White
Stamp:  Gorjuss Girl (not sure of her name)
Other:  Pinking Hearts Border Punch, Dimensionals
Non SU:  Watercolour Paper, Prismacolor Pencils, Gamsol, Glitter Pen, White Gel Pen, Clear Glaze Pen, Joyful Juliana Font

Wednesday, April 11, 2012

FM #53 & JAI #112 - More New Goodies :)

I decided to squeeze in another entry for this week's Friday Mashup, using the gorgeous colours from Just Add Ink's current challenge.  This is what I came up with:-


The Friday Mashup Challenge is for a fancy fold card, a row from the tic tac toe grid, or a mashup of both.  I've gone with the column on the left, using lace, pearls & flowers (you can see my previous entry here):-


& here are the JAI colours:-


I've gone really vintage with this one, with lots of sponging, 3D blooms & pearls.  The main panel has been stamped in Versamark & Choc Chip, then clear embossed.  I've coloured the blossom images with stamp pad ink & blender pens, & then added 3D blooms & pearls.  Both die cut layers & the banner have been layered on dimensionals.


I was really happy with the pink printed panel peeking out of the bottom of the card, which is stamped with the same image as the main panel & coloured with blender pens & ink.  (Gotta love the stampamajig!)  :)  

Check below for the huge list of goodies that I put to use on this one!

Card Components  (All SU)
Cardstock:  Pink Pirouette, Crumb Cake, Very Vanilla, Chocolate Chip
Stamps:  Apothecary Art, Elegant Thank You (sans the twirly whirly bits), Texture Wheel
Inks:  Pink Pirouette, Crumb Cake, Chocolate Chip, Versamark
Other:  Framelit Dies, Edgelit Dies, Adorning Accents Embossing Folder, Clear Embossing Powder, Dimensionals, Petal Cone Die, Beautiful Wings Embosslit, Boho Blossoms Punch, Itty Bitty Shapes Punch, Victoria Crochet Trim, Basic Jewels Pearls, Silver & Mini Brads

Tuesday, April 10, 2012

The Friday Mashup #53 - Tic Tac Toe

I've always wanted to play along in The Friday Mashup & it seems, finally, I've gotten around to it.  :)

The Mashup Team have got a cool challenge - Use a row from their tic tac toe grid, or use a special fold, or mash it up & use both.  I've gone for the total mashup, using Pearls, Lace & Flowers from the grid, as well as using a joy fold!  Here's the result:-

(You can click on any of the pictures if you want a larger view.)

I've had fun with some new SU goodies, using the framelit dies on both the main image panel & the black flap on the left hand side of the card.  The image has been stamped & then coloured using blender pens & inkpads.  Small pearls have been added to the rose centres.

Here is the card partly open:-


& fully open:-


I've added a vanilla panel to the inside of the black flap, to cover up the brad pins from the flower.  Here's a close up of the bloom (I even managed to capture a bit of sparkle from the shimmer mist):-


If you would like instructions for these blooms, you can find them here, at Joanne Leddy's blog.  :)

There's still a little bit of time left if you want to play along in the challenge - here are the tic tac toe details & the link:-


Card Components
All Stampin' Up! - if you would like further details - please ask.  :)

Tuesday, April 3, 2012

Magnetic Display Board

Well it's certainly been a while since I was last here, sorry 'bout that (been busy with all kinds of things & then I was sick as well).

Thought I would share this idea with you, which was inspired by a baking sheet noticeboard idea that Bronwyn Eastley had told me about.

I purchased a timber picture frame, removed the glass & asked my hubby to cut some metal sheet the same size as the backing panel.  I taped the sharp edges of the metal & then attached some homespun cotton fabric to the sheet using spray adhesive.  I popped this fabric covered sheet into the frame, followed by the backing board.

Voila, this is the end result:-


It makes a fantastic display board.  Now I just need to get some more pretty magnets, as I have already been back to buy another frame & I've "ordered" another metal sheet.   :)

If you would like to see more work from the ladies who made these cards, please visit Lynne, Christine & Nikki (& the one in the bottom LH corner is a favourite of mine).  :)