Pages

Tuesday, August 30, 2016

I ♥ The Jar of Love!

My favourite bundle in the 2016-17 Annual Catty would have to be the Jar of Love stamp set & the matching Everyday Jar Framelit Dies.  Here they are in action with a small tag from the Tags & Labels Framelit Dies:-


There are so many possibilities with this set. ♥

Thanks for stopping by.  :)

Card Components
(All Stampin' Up!)
Crumb Cake & Whisper White Cardstock
Soft Sky, Blushing Bride, Flirty Flamingo, Wisteria Wonder, Pear Pizzazz, 
Crumb Cake & VersaMark inks
Pool Party Embossing Powder (retired)
Jar of Love & Gorgeous Grunge Stamp Sets
Everyday Jar plus Tags & Labels Framelit Dies
Linen Thread
Dimensionals & Glue Dots

Friday, August 12, 2016

Home Sweet Home Tealight Holder for The Paper Players

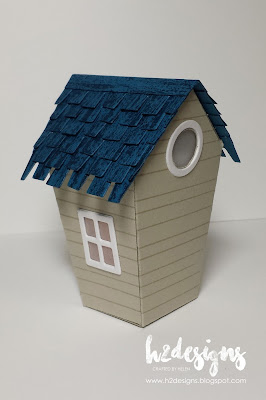
It's been ages since I have posted anything, so I thought I would join in the challenge at The Paper Players this week where Joanne has suggested a project with a light source.  Seeing as I have some fun new products from Stampin' Up!, I thought I would take the challenge literally & include an actual light inside my project:-


These Home Sweet Home Thinlits Die & the matching Sweet Home Stamp Set are adorable, but they are tiny.  Here is a size comparison with a re-inker bottle:-


Seeing as the house isn't big enough to accommodate a standard size tealight in the base of the box, I suspended a panel in the attic to hold the tealight in upside down:-


ETA:  You can find the dimensions of the tealight panel in the comments!  :)

Here it is without the tealight inside:-


I placed some vellum behind the circular window on the back door, but only adhered it above the window.  This way you can put your fingertip into the hole to grip & open the door, but the vellum drops back in place to filter the light & obscure the tealight base.  Here is the back panel closed:-


I inked the front door stamp with VersaMark ink & then Dapper Denim ink so that I could clear emboss it to get a nice, glossy finish.  I added a pearl door knob.  All the white trims are double layers to give extra definition:-


The roof shingles have been cut from Dapper Denim & then inked with an image from the Timeless Textures Stamp Set to give it a bit of interest.  I added a strip of "capping" over the top point of the roof to get a neat finish:-


I can see I will be making lots more of these cute little abodes!  :)

If you would like to see all the fabulous projects the Design Team at the Paper Players have for this challenge, as well as the other entrants in the gallery, click on the image below:-


Thanks for stopping by!  :)

Project Components
All Stampin' Up!
plus a tealight

Friday, June 24, 2016

Celebrating with The Paper Players - SU Sweet Cupcake!

I couldn't let this week's challenge at The Paper Players pass by without partcipating!  The Team are celebrating their 300th Challenge!  Woohoo!

I was very honoured to be part of The Paper Players Design Team way back in 2012 & loved working with this talented & fabulous group.  :)

This week to celebrate this awesome milestone, Jaydee is hosting a "Clean & Simple Celebration" themed challenge.  Here is my project:-


I have used the fun, new, photo-realistic Sweet Cupcake stamp set & matching dies.  I have kept the card very clean with an all white background, broken up with some embossed texture. Dazzling Diamonds have been added to the frosting with VersaMark & Heat & Stick Powder for some sparkle.

You can check out the Design Team's projects, as well as the other gallery entrants here (simply click on the image below):-


Thanks for stopping by!  :)

Sunday, May 29, 2016

CASE-ing the Catty #80 - Farewell!

Hello & welcome to this week's CASE-ing the Catty's Blog Hop!

Each week the Crew members will take inspiration from a section or theme of the current Stampin' Up Catalogues to create their projects.  The acronym "CASE" stands for "Copy And Share Everything" or "Copy And Selectively Edit".

This week the CTC Crew are saying farewell to a favourite product that is about to retire. 

I am also saying farewell to the fabulous Design Team at CASE-ing the Catty....  Thank you to everyone at CTC (both past & present), it has been wonderful working with you! ♥

There are lots of wonderful products retiring from both the SU Annual & Occasions Catalogues, but don't be sad, that just means there are heaps of wonderful new goodies in the upcoming 2016-17 Annual Catalogue.  Yay!  :)

I have chosen to say goodbye to lots of retiring products to create my project:-


I really like the steel rule dies & am sad to see them leaving the Catty altogether.  I have used the Fry Box to house my flowers, which feature foliage from the Bouquet Bigz L Die:-


The blossoms are made from 2 layers each from the 1.1/4" & 7/8" scallop circle punches (cut from Pumpkin Pie & Peekaboo Peach cardstock), misted with alcohol, scrunched & held together with mini silver split pins.  The small flowers are punched from one of the Itty Bitty Accents punches, finished off with a Pumpkin Pie candy dot.  The sentiment comes from one of my favourite sets, All Boxed Up, & is on a piece die-cut with a Handpicked Framelit.

The ribbon is a piece of Delightful Dijon Dotted Lace Trim which has been dyed with Black Staz On ink, giving it a lovely, deep Bronze/Olive colour:-


To support all the flowers & foliage, I die-cut two pieces of window sheet the same size as the rear panel of the box, trimming them to two different heights & secured them inside the box (the same way you would construct a "card in the box").

To work your way around the Hop & see lots of inspiration from our fabulous Team members, simply click on the "Next Blog" & "Previous Blog" buttons below.  (Go forward to see Bronwyn's goodbye project or backwards to see Rachel's farewell to Summer Silhouettes.)


Should you get lost along the way, you can find the entire list of participants on the CASE-ing the Catty blog post:-


If you are feeling inspired, we would love you to share a new project showcasing retiring product(s).  Simply link it up in the gallery on the CTC post (click on the icon below).  At the end of each month, the Crew will choose a Winner.


Thanks for stopping by!  :)

Sunday, May 22, 2016

CASE-ing the Catty #79 - 3D with Pyramid Pals

Hello & welcome to this week's CASE-ing the Catty's Blog Hop where the Crew are featuring 3D & kit projects!  You can find 3D projects scattered throughout the Occasions Catalogue & product kits on pages 32, 33 & 49.

Each week the Crew members take inspiration from a section or theme of the current Stampin' Up Catalogues to create their projects.  The acronym "CASE" stands for "Copy And Share Everything".

I was inspired by the critters on page 44 & have chosen to create a chicken & chick using the Pyramid Pals Thinlits Dies:-


The chicken is made at the standard size of the pyramid box.  I used the paw die to create the chicken's "comb" & the tiny pear shaped die to create the "wattle" under the chicken's beak.  The wings are made from the tree top of the tree builder punch (trimmed to make a straight top edge).  

To make the chick smaller than the chicken, I trimmed the die-cut panels down by approximately 3/8" on each edge of the triangle & on two edges of the square base.  His wings are made from the frosting of the cupcake builder die.  


Their beady chicken eyes are made from rhinestone jewels that have been coloured with a black sharpie marker:-


These sweet little pyramid shaped boxes are perfect to hold a little treat & can be turned into all sorts of animals (there are several in the catty).

To work your way around the Hop & see lots of inspiration from our fabulous Team members, simply click on the "Next Blog" & "Previous Blog" buttons below.  (Go forward to see the fabulous project Monique has created or backwards to see Rachel's awesome dinosaur card & packaging.)


Should you get lost along the way, you can find the entire list of participants on the CASE-ing the Catty blog post:-


If you are feeling inspired, we would love you to CASE a 3D or kit project from the Occasions catalogue & link it up in the gallery on the CTC post (click on the icon below).  At the end of each month, the Crew will choose a Winner.


Thanks for stopping by!  :)

Sunday, May 1, 2016

CASE-ing the Catty #76 - Have A Cuppa Inspiration

Hello & welcome to CASE-ing the Catty's Blog Hop!

Each week the Crew members take inspiration from a section or theme of the current Stampin' Up Catalogues to create their projects.  The acronym "CASE" stands for "Copy And Share Everything" or "Copy And Selectively Edit".

This week the CTC Crew are choosing a project from the "Have A Cuppa" section of the Occasions Catalogue to CASE (pages 34-37).

There are lots of cute tea-cup creations to CASE in this section of the catty, but I have taken my inspiration from the colours of the Have A Cuppa DSP Stack.  The bright, fun colours are are Basic Grey, Bermuda Bay, Crushed Curry, Melon Mambo, Pool Party, Whisper White & Wisteria Wonder.

These happy colours needed a fun creation, so I made a jar shaker filled with smiley faces:-


I used the Project Life Cards & Labels Framelits for the Jar & Lid.  Isn't it amazing what the addition of a little scoring can do to a piece of Silver Foil sheet?  Last week I used a Project Life Photo Pocket Page to create a photo frame (you can see it here), so I used another piece of the Pocket Page in lieu of a Window Sheet for the shaker.  I stamped the little banner sentiment twice & trimmed the top layer to suit.  The Crushed Curry Baker's Twine is left over from the Hello Life Project Kit (you can see how I used the kit here).

So I have only recently acquired the Project Life Paper Clips Thinlits, but ever since I first saw them in the Annual Catalogue (p173), I have been envisioning lots of smiley faces, lol!  :)  :)  :)

Here is the circle clip die, an actual die-cut & a smiley face:-


To make the smiley face, I die-cut a circle clip from Crushed Curry cardstock.  Before removing the die from the cardstock, I used a sharp pencil to mark the location of the eyes.  Then I centred the pencil mark in the 1/8" handheld punch & punched each eye.  To finish off, the Crushed Curry smiley face was adhered to a Basic Grey cardstock circle (or the bib from the Baby's First Framelits works well too).

Here is an image of the paper stack (from page 35) that inspired my creation:-


To work your way around the Hop & see lots of inspiration from our fabulous Team members, simply click on the "Next Blog" & "Previous Blog" buttons below.  (Go forward to see the gorgeous creations Liz has for you or backwards to see Monique's wonderful project.)


Should you get lost along the way, you can find the entire list of participants on the CASE-ing the Catty blog post:-


If you are feeling inspired, we would love you to CASE a project from the Sale-A-Bration catalogue & link it up in the gallery on the CTC post (click on the icon below).  At the end of each month, the Crew will choose a Winner.


Thanks for stopping by!  :)

Sunday, April 24, 2016

CTC75 - Mother's Day Inspiration

Hello & welcome to this week's CASE-ing the Catty's Blog Hop!  It's great to be joining the rest of the Crew after time away.

Each week the CTC Crew members will take inspiration from a section or theme of the current Stampin' Up Catalogues to create their projects.  The acronym "CASE" stands for "Copy And Share Everything" or "Copy And Selectively Edit".

This week the CTC Crew are choosing to CASE a Mother's Day themed project from either the current Annual Catalogue or the Occasions Catalogue.

I made a magnetic picture frame using the botanical builder framelits & a pocket cut from a Project Life sleeve:-


Here is the back of the frame:-


To make the frame, I glued together two layers of Tip Top Taupe cardstock & cut an aperture for the photo.  I trimmed a 4x6 pocket (from a #05 page from the Variety pack of PL pages) & stuck both the short sides of the pocket to the back of the frame using Tear n Tape.  Then I used washi tape to secure the two side & bottom edges of the pocket to the frame.  I also secured the inside top edge to the frame so that the photo will slide in & out easily without catching:-


Then I added a couple of magnetic strips, so it can be displayed on the fridge (or a filing cabinet).  These frames would make great little gifts for a Mother's Day stall.  ;)

Here is the inspiration for my frame - a decorated timber photo frame from page 22 of the Occasions catalogue:-


To work your way around the Hop & see lots of inspiration from our fabulous Team members, simply click on the "Next Blog" & "Previous Blog" buttons below.  (Go forward to see Monique's fabulous project or backwards to see the delightful creation Julia has for you.)


Should you get lost along the way, you can find the entire list of participants on the CASE-ing the Catty blog post:-


If you are feeling inspired, we would love you to share your Mother's Day CASE & link it up in the gallery on the CTC post (click on the icon below).  At the end of each month, the Crew will choose a Winner.


Thanks for stopping by!  :)

Sunday, March 20, 2016

Cupcake Oven & Pop-Up Kitchen Card

Helloooo!

I  thought I would share a fun project I made recently as I will be missing a few CASE-ing the Catty Blog Hops.  (You can find what the rest of the CTC Crew are up to here.)

Our DD's bestie is an apprentice pastry chef, so we thought she might like a yummy red velvet cupcake with some appropriate packaging:-


I was inspired by a cute little bakery box oven, made by Marzi, which you can find here.

The entire project is made from Stampin' Up! supplies (some of them are retired).  I played around with some scrap paper to form a prototype & then made this version, which is constructed a bit differently to Marzi's version.  I used the Simply Scored Tool to create the basic box for the oven.  I also added an extra panel inside the base of the oven, which the cupcake "nests" in.  The hotplates are punched from back glimmer paper layered on silver foil sheet.   The little gauge is a teeny tiny piece of clipart that I printed from the computer & then placed an itty bitty accent epoxy sticker on top.  The oven mitt was made by trimming down a gingerbread man die-cut.


Sorry, I don't have any plans to share on my design, but you can find great directions for Marzi's oven here.

I had so much fun creating the oven that I made a co-ordinating pop-up kitchen card to go with it.  I used the base of a retired pop-up die & added my own cabinetry, oven, tile & hardwood floor.  Here is the inside:-


Thanks for dropping by.  See you again soon!  :)

Sunday, March 6, 2016

CTC68 - Love Blossoms with Butterfly Framelits!

Oops!  That title should be CTC69!  :o

So hello & welcome to this week's CASE-ing the Catty's Blog Hop!

Each week the Crew members will take inspiration from a section or theme of the current Stampin' Up Catalogues to create their projects. The acronym "CASE" stands for "Copy And Share Everything" or "Copy And Selectively Edit".  :)

This week the CTC Crew are choosing a project from the Love Blossoms section (pages 16-25) of the Occasions Catalogue to CASE.

Here is my project:-


You can find the card I was inspired by on the top right of page 19:-


Instead of the stunning Rose Garden Thinlits Dies as per the sample, my card features the Butterfly Thinlits Die from the Annual Catalogue. I have used thick Whisper White cardstock die-cuts over a watercoloured base. The sentiment panel has multi-coloured stamping & a small punched flower with an enamel dot centre. This panel is then layered on a banner cut from washi covered window sheet.  I also added an extra mat to my design to give some more distinction between the pool party watercolouring & the white card base.


To create the watercoloured panel, I used the waste cardstock from the Butterfly Framelit die-cut as a stencil & traced inside the opening with grey lead pencil to get an outline for each butterfly. Using Pool Party ink from the stamp pad lid & an aquapainter, I then painted in the background. Once this was dry, I erased the pencil lines & coloured the butterflies the same way as the background, using Crushed Curry, Tangelo Twist & Cajun Craze inkpads. Once the entire sheet was dry, I attached the butterfly die-cuts, trimming to suit the panel.

There are lots of fabulous projects in this section of the catalogue & our Crew have some fantastic examples for you. To work your way around the Hop, simply click on the "Next Blog" & "Previous Blog" buttons below. (Go forward to see Julia's sweet scrapbook page or backwards to see the pretty wedding cards Liz has shared.)


Should you get lost along the way, you can find the entire list of participants on the CASE-ing the Catty blog post:-


If you are feeling inspired, we would love you to CASE a project from the Love Blossoms section (Occasions Catty pages 16-25) & link it up in the gallery on this CTC post (click on the icon below). At the end of each month, the Crew will choose a Winner.


Thanks for stopping by!  :)