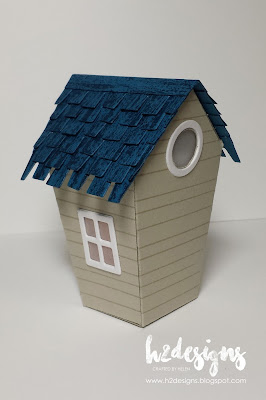
These Home Sweet Home Thinlits Die & the matching Sweet Home Stamp Set are adorable, but they are tiny. Here is a size comparison with a re-inker bottle:-
Seeing as the house isn't big enough to accommodate a standard size tealight in the base of the box, I suspended a panel in the attic to hold the tealight in upside down:-
ETA: You can find the dimensions of the tealight panel in the comments! :)
Here it is without the tealight inside:-
I placed some vellum behind the circular window on the back door, but only adhered it above the window. This way you can put your fingertip into the hole to grip & open the door, but the vellum drops back in place to filter the light & obscure the tealight base. Here is the back panel closed:-
I inked the front door stamp with VersaMark ink & then Dapper Denim ink so that I could clear emboss it to get a nice, glossy finish. I added a pearl door knob. All the white trims are double layers to give extra definition:-
The roof shingles have been cut from Dapper Denim & then inked with an image from the Timeless Textures Stamp Set to give it a bit of interest. I added a strip of "capping" over the top point of the roof to get a neat finish:-
I can see I will be making lots more of these cute little abodes! :)
If you would like to see all the fabulous projects the Design Team at the Paper Players have for this challenge, as well as the other entrants in the gallery, click on the image below:-
Thanks for stopping by! :)
Project Components
All Stampin' Up!
plus a tealight
12 comments:
This little house is adorable! Love that you can fit a light inside! Glad you joined us at the Paper Players!
I am so glad you posted this, Helen! First, it's adorable and VERY clever, especially with the way you engineered the tealight! Second, because I wondered how small it was! Third, I am just happy you shared it with the Paper Players....so sweet!
Oh, my, Helen this is adorable!! I had a thought about putting a light in this tiny house too, but didn't realise it would be such a tight fit. I love your solution. I might just borrow that idea - thanks! xox
What a sweet little house Helen and perfectly lit too - and such an informative post! I didn't appreciate quite how small this house would be and I appreciate your tips on mounting the tea light - so useful! Thanks for playing along with my light-themed challenge over at The Paper Players this week!
What a gorgeous little house. Thanks for a very informative post about the house size, and how you decorated it and the instructions on how to add a tea light! Cheers Donna Z :)
Love your creative brain. This is very clever.
I just love this little house. I have been toying with the idea of purchasing this set, now I think I will probably have to and then teach a class with it. Thanks so much for sharing. Susan Aberdeen, Maryland
Genius! We made Halloween Houses and struggled with turning the tealight on and off. :( Thank you for sharing! A brilliant solution! :)
Hi Helen,
This is adorable! I was wondering if you would mind sharing the dimensions you used for the tealight "seat"? Thanks in advance! :)
Hi Alicia, the tealight "seat" panel is 3" wide x 1.1/4" deep. On the 3" side it is scored at 5/8" & 2.3/8" to create the tabs that are stuck to the side walls of the house. The "seat" panel is butted up to the front wall of the house so there is enough space for the tab on the back panel when you close it. :)
Thanks so much for the measurements! :)
Thank you so much for your sharing! I saw something like this in a magazine, not nearly as nice as yours!!! So I really appreciate the measurements of your self too!!!
Have an awesome day!
Blessings!
Lois
Post a Comment